Parányi számítógép
Soros port illesztése 2. (szoftver)
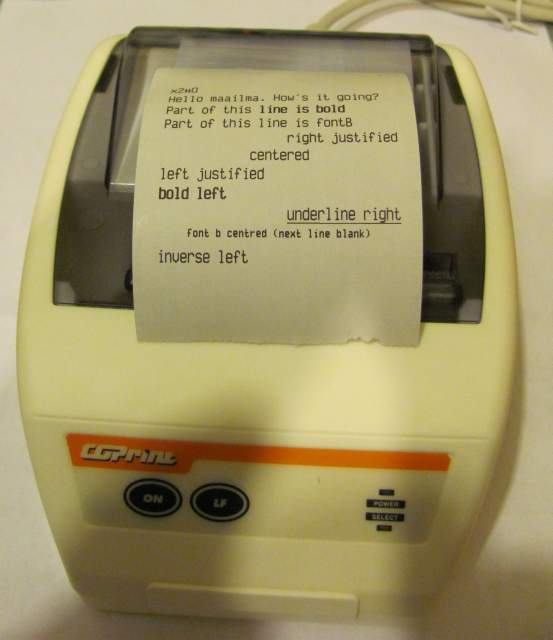 Vegyük lépésről lépésre, mit kell tenni egy soros vonalra csatolt hőírós nyomtató kezelésénél.
Az előző bejegyzésben már részletesen leírtam milyen hardver-kialakításra van szükség, most mélyedjünk el a szoftverben.
- A soros portot alapból a Linux terminál fogja, ezért nem fog működni a nyomtató akárhogy is akarjuk. A következő beállításokkal azonban szóra bírható.
- Adjuk meg az engedélyt a pi nevű felhasználónak (alapértelmezett név), hogy kezelhesse a GPIO soros vonalt:
sudo usermod -a -G dialout pi - Nyitni kell egy terminál ablakot, és át kell szerkeszteni a cmdline.txt fájlt.
cd /boot
sudo nano cmdline.text
Eredetileg ez van benne:
dwc_otg.lpm_enable=0 console=ttyAMA0,115200 kgdboc=ttyAma0,11520 console=tty1 root=/dev/mmcblk0p2 rootfstype=ext4
Erre kell lecserélni:
dwc_otg.lpm_enable=0 console=tty1 root=/dev/mmcblk0p2 rootfstype=ext4 rootwait - Át kell szerkeszteni az etc/inittab -ot is: ki kell törölni a köv. sort:
#2:23:respawn:/sbin/getty -L ttyAMA0 115200 vt100 - Indítsuk újra a gépet!
- Az előző sorból láthatjuk, hogy a soros port neve : dev/ttyAMA0 ez később még fontos lesz
- A soros vonal kezeléséhez és teszteléshez az alábbiakat kell telepíteni:
sudo apt-get install python-serial
sudo apt-get install python-imaging-tk
sudo apt-get install minicom
A minicom program segítségével a soros porton érkező adatokat tudjuk fogani terminál ablakban. Ezt a programot azért telepítettem, hogy nyomtató és soros illesztő hardver nélkül is tesztelni tudja a rendszert. Mindössze arra van szükség, hogy a ki és bemenetet (TX, RX) összekössem egy jumperrel a GPIO-n. Így azonnal visszakapjuk az elküldött adatokat. - Adat fogadás bekapcsolása minicom programmal: nyissunk egy új termnál ablakot és indítsuk el az adatgyűjtőt az alábbi paraméterkkel:
minicom -b 9600 -o -D /dev/ttyAMA0 - Be kell szerezni a tesztprogramot:
- Töltsük le a tesztprogramot az alábbi helyről: https://github.com/luopio/py-thermal-printer/
- Bemásoltam a kódot az első kommentbe, ezt kell elmenteni a print.py fájlba.
- telepítsük a git-core programot és annak segítségével szerezzük be
sudo apt-get install git-core
cd ~/git
git clone git://github.com/luopio/py-thermal-printer.git
- A letöltött programot nyissük meg egy szövegszerkesztővel:
sudo nano printer.py
Illeszünk be egy sort az elejére: #!/usr/bin/env python
majd ellenőrizzük a port számot (megegyezik a fent beírtakkal?) - A fájl legyen végrehajtható:
chmod 777 printer.py - Futtasuk a python nyelven írt teszt programot:python printer.py
- Ha minden jól sikerült a minicom ablakban megjelenik sok-sok új sor.
Forrás 1.: http://natemcbean.com/2012/11/rpi-thermal-printer/
Forrás 2.: (videóval): http://natemcbean.com/2012/11/rpi-thermal-printer/
Forrás 3.: http://www.varesano.net/blog/fabio/serial%20rs232%20connections%20python
Hozzászólások
RasPeti
szo, 2013/03/09 - 11:01
Permalink
printer.py
#!/usr/bin/env python
#coding=utf-8
import serial, time
#===========================================================#
#===========================================================#
# MUX SETTINGS (Ängström 2012.05, also work on ubuntu 12.04)
# echo 1 > /sys/kernel/debug/omap_mux/spi0_sclk
# echo 1 > /sys/kernel/debug/omap_mux/spi0_d0
#===========================================================#
#===========================================================#
class ThermalPrinter(object):
'''
Thermal printing library that controls the "micro panel thermal printer" sold in
shops like Adafruit and Sparkfun (e.g. http://www.adafruit.com/products/597).
Mostly ported from Ladyada's Arduino library
(https://github.com/adafruit/Adafruit-Thermal-Printer-Library) to run on
BeagleBone.
Currently handles printing image data and text, but the rest of the
built-in functionality like underlining and barcodes are trivial
to port to Python when needed.
If on BeagleBone or similar device, remember to set the mux settings
or change the UART you are using. See the beginning of this file for
default setup.
Thanks to Matt Richardson for the initial pointers on controlling the
device via Python.
@author: Lauri Kainulainen / White Sheep Isobar (whitesheep.fi)
'''
BAUDRATE = 9600
TIMEOUT = 3
SERIALPORT = '/dev/ttyAMA0'
# pixels with more color value (average for multiple channels) are counted as white
# tweak this if your images appear too black or too white
black_threshold = 48
# pixels with less alpha than this are counted as white
alpha_threshold = 127
printer = None
_ESC = chr(27)
# These values (including printDensity and printBreaktime) are taken from
# lazyatom's Adafruit-Thermal-Library branch and seem to work nicely with bitmap
# images. Changes here can cause symptoms like images printing out as random text.
# Play freely, but remember the working values.
# https://github.com/adafruit/Adafruit-Thermal-Printer-Library/blob/0cc508...
# Set "max heating dots", "heating time", "heating interval"
# n1 = 0-255 Max printing dots, Unit (8dots), Default: 7 (64 dots)
# n2 = 3-255 Heating time, Unit (10us), Default: 80 (800us)
# n3 = 0-255 Heating interval, Unit (10us), Default: 2 (20us)
# The more max heating dots, the more peak current will cost
# when printing, the faster printing speed. The max heating
# dots is 8*(n1+1). The more heating time, the more density,
# but the slower printing speed. If heating time is too short,
# blank page may occur. The more heating interval, the more
# clear, but the slower printing speed.
def __init__(self, heatTime=120, heatInterval=50, heatingDots=7, serialport=SERIALPORT):
self.printer = serial.Serial(serialport, self.BAUDRATE, timeout=self.TIMEOUT)
self.printer.write(self._ESC) # ESC - command
self.printer.write(chr(64)) # @ - initialize
self.printer.write(self._ESC) # ESC - command
self.printer.write(chr(55)) # 7 - print settings
self.printer.write(chr(heatingDots)) # Heating dots (20=balance of darkness vs no jams) default = 20
self.printer.write(chr(heatTime)) # heatTime Library default = 255 (max)
self.printer.write(chr(heatInterval)) # Heat interval (500 uS = slower, but darker) default = 250
# Description of print density from page 23 of the manual:
# DC2 # n Set printing density
# Decimal: 18 35 n
# D4..D0 of n is used to set the printing density. Density is 50% + 5% * n(D4-D0) printing density.
# D7..D5 of n is used to set the printing break time. Break time is n(D7-D5)*250us.
printDensity = 15 # 120% (? can go higher, text is darker but fuzzy)
printBreakTime = 15 # 500 uS
self.printer.write(chr(18))
self.printer.write(chr(35))
self.printer.write(chr((printDensity << 4) | printBreakTime))
def reset(self):
self.printer.write(self._ESC)
self.printer.write(chr(64))
def linefeed(self):
self.printer.write(chr(10))
def justify(self, align="L"):
pos = 0
if align == "L":
pos = 0
elif align == "C":
pos = 1
elif align == "R":
pos = 2
self.printer.write(self._ESC)
self.printer.write(chr(97))
self.printer.write(chr(pos))
def bold_off(self):
self.printer.write(self._ESC)
self.printer.write(chr(69))
self.printer.write(chr(0))
def bold_on(self):
self.printer.write(self._ESC)
self.printer.write(chr(69))
self.printer.write(chr(1))
def font_b_off(self):
self.printer.write(self._ESC)
self.printer.write(chr(33))
self.printer.write(chr(0))
def font_b_on(self):
self.printer.write(self._ESC)
self.printer.write(chr(33))
self.printer.write(chr(1))
def underline_off(self):
self.printer.write(self._ESC)
self.printer.write(chr(45))
self.printer.write(chr(0))
def underline_on(self):
self.printer.write(self._ESC)
self.printer.write(chr(45))
self.printer.write(chr(1))
def inverse_off(self):
self.printer.write(chr(29))
self.printer.write(chr(66))
self.printer.write(chr(0))
def inverse_on(self):
self.printer.write(chr(29))
self.printer.write(chr(66))
self.printer.write(chr(1))
def print_text(self, msg, chars_per_line=None):
''' Print some text defined by msg. If chars_per_line is defined,
inserts newlines after the given amount. Use normal '\n' line breaks for
empty lines. '''
if chars_per_line == None:
self.printer.write(msg)
else:
l = list(msg)
le = len(msg)
for i in xrange(chars_per_line + 1, le, chars_per_line + 1):
l.insert(i, '\n')
self.printer.write("".join(l))
print "".join(l)
def print_markup(self, markup):
"""
Print text with markup for styling.
Keyword arguments:
markup -- text with a left column of markup as follows:
first character denotes style (n=normal, b=bold, u=underline, i=inverse, f=font B)
second character denotes justification (l=left, c=centre, r=right)
third character must be a space, followed by the text of the line
"""
lines = markup.splitlines(True)
for l in lines:
style = l[0]
justification = l[1].upper()
text = l[3:]
if style == 'b':
self.bold_on()
elif style == 'u':
self.underline_on()
elif style == 'i':
self.inverse_on()
elif style == 'f':
self.font_b_on()
self.justify(justification)
self.print_text(text)
if justification != 'L':
self.justify()
if style == 'b':
self.bold_off()
elif style == 'u':
self.underline_off()
elif style == 'i':
self.inverse_off()
elif style == 'f':
self.font_b_off()
def convert_pixel_array_to_binary(self, pixels, w, h):
# convert the pixel array into a black and white plain list of 1's and 0's
# width is enforced to 384 and padded with white if needed
black_and_white_pixels = [1] * 384 * h
if w > 384:
print "Bitmap width too large: %s. Needs to be under 384" % w
return False
elif w < 384:
print "Bitmap under 384 (%s), padding the rest with white" % w
print "Bitmap size", w
if type(pixels[0]) == int: # single channel
print " => single channel"
for i, p in enumerate(pixels):
if p < self.black_threshold:
black_and_white_pixels[i % w + i / w * 384] = 0
else:
black_and_white_pixels[i % w + i / w * 384] = 1
elif type(pixels[0]) in (list, tuple) and len(pixels[0]) == 3: # RGB
print " => RGB channel"
for i, p in enumerate(pixels):
if sum(p[0:2]) / 3.0 < self.black_threshold:
black_and_white_pixels[i % w + i / w * 384] = 0
else:
black_and_white_pixels[i % w + i / w * 384] = 1
elif type(pixels[0]) in (list, tuple) and len(pixels[0]) == 4: # RGBA
print " => RGBA channel"
for i, p in enumerate(pixels):
if sum(p[0:2]) / 3.0 < self.black_threshold and p[3] > self.alpha_threshold:
black_and_white_pixels[i % w + i / w * 384] = 0
else:
black_and_white_pixels[i % w + i / w * 384] = 1
else:
print "Unsupported pixels array type. Please send plain list (single channel, RGB or RGBA)"
print "Type pixels[0]", type(pixels[0]), "haz", pixels[0]
return False
return black_and_white_pixels
def print_bitmap(self, pixels, w, h, output_png=False):
'''
Best to use images that have a pixel width of 384 as this corresponds
to the printer row width.
pixels = a pixel array. RGBA, RGB, or one channel plain list of values (ranging from 0-255).
w = width of image
h = height of image
if "output_png" is set, prints an "print_bitmap_output.png" in the same folder using the same
thresholds as the actual printing commands. Useful for seeing if there are problems with the
original image (this requires PIL).
Example code with PIL:
import Image, ImageDraw
i = Image.open("lammas_grayscale-bw.png")
data = list(i.getdata())
w, h = i.size
p.print_bitmap(data, w, h)
'''
counter = 0
if output_png:
import Image, ImageDraw
test_img = Image.new('RGB', (384, h))
draw = ImageDraw.Draw(test_img)
self.linefeed()
black_and_white_pixels = self.convert_pixel_array_to_binary(pixels, w, h)
print_bytes = []
# read the bytes into an array
for rowStart in xrange(0, h, 256):
chunkHeight = 255 if (h - rowStart) > 255 else h - rowStart
print_bytes += (18, 42, chunkHeight, 48)
for i in xrange(0, 48 * chunkHeight, 1):
# read one byte in
byt = 0
for xx in xrange(8):
pixel_value = black_and_white_pixels[counter]
counter += 1
# check if this is black
if pixel_value == 0:
byt += 1 << (7 - xx)
if output_png: draw.point((counter % 384, round(counter / 384)), fill=(0, 0, 0))
# it's white
else:
if output_png: draw.point((counter % 384, round(counter / 384)), fill=(255, 255, 255))
print_bytes.append(byt)
# output the array all at once to the printer
# might be better to send while printing when dealing with
# very large arrays...
for b in print_bytes:
self.printer.write(chr(b))
if output_png:
test_print = open('print-output.png', 'wb')
test_img.save(test_print, 'PNG')
print "output saved to %s" % test_print.name
test_print.close()
if __name__ == '__main__':
import sys, os
if len(sys.argv) == 2:
serialport = sys.argv[1]
else:
serialport = ThermalPrinter.SERIALPORT
if not os.path.exists(serialport):
sys.exit("ERROR: Serial port not found at: %s" % serialport)
print "Testing printer on port %s" % serialport
p = ThermalPrinter(serialport=serialport)
p.print_text("\nHello maailma. How's it going?\n")
p.print_text("Part of this ")
p.bold_on()
p.print_text("line is bold\n")
p.bold_off()
p.print_text("Part of this ")
p.font_b_on()
p.print_text("line is fontB\n")
p.font_b_off()
p.justify("R")
p.print_text("right justified\n")
p.justify("C")
p.print_text("centered\n")
p.justify() # justify("L") works too
p.print_text("left justified\n")
markup = """bl bold left
ur underline right
fc font b centred (next line blank)
nl
il inverse left
"""
# p.print_markup(markup)
# runtime dependency on Python Imaging Library
# import Image, ImageDraw
# i = Image.open("example-lammas.png")
# data = list(i.getdata())
# w, h = i.size
# p.print_bitmap(data, w, h, True)
p.linefeed()
p.linefeed()
p.linefeed()
RasPeti
v, 2013/03/10 - 16:20
Permalink
Rövid python program (RS232)
Egyszerű és könnyen értelmezhető python kód. Soros vonalon parancsokat küld a másik eszköznek.
Íme a kód:
import time
import serial

# configure the serial connections (the parameters differs on the device you are connecting to)
ser = serial.Serial(
	port='/dev/ttyAMA0',
	baudrate=9600,
	parity=serial.PARITY_ODD,
	stopbits=serial.STOPBITS_TWO,
	bytesize=serial.SEVENBITS
)

ser.open()
ser.isOpen()

print 'Enter your commands below.\r\nInsert "exit" to leave the application.'

input=1
while 1 :
	# get keyboard input
	input = raw_input(">> ")
        # Python 3 users
        # input = input(">> ")
	if input == 'exit':
		ser.close()
		exit()
	else:
		# send the character to the device
		# (note that I happend a \r\n carriage return and line feed to the characters - this is requested by my device)
		ser.write(input + '\r\n')
		out = ''
		# let's wait one second before reading output (let's give device time to answer)
		time.sleep(1)
		while ser.inWaiting() > 0:
			out += ser.read(1)

		if out != '':
			print ">>" + out
Forrás: www.varesano.net/blog/fabio/serial rs232 connections python